Learning Laravel/Mysql/Inertia/Vite/Vue To Create A Shopping List App
Lasted edited: 8/17/22
A work in progress. Maybe.
My ultimate goal of this post is to have the code up on GitHub and a working shopping list app that can be used. In the meantime, this is definitely a work in progress. But it’s getting there.
Background.
I run this genealogy website.
Unlike a typical genealogy website, my focus has switched from finding the “second cousin of my great-grandfather” to integrating world historical information to my family history. I currently use Webtrees which is a great open source genealogy application.
But for my history focused website, I think something else would work better. And that’s why I’ve begun to learn Laravel.
Unfortunately, a few weeks ago, Laravel switched from using a bundler named mix to another bundler named vite (I’ll get to what that means real fast). But my purpose of mentioning this is that most tutorials out there still discuss mix which kind of made this whole process even more difficult for me.
But anyway, my ultimate website is going to need a database and a way of interacting with the data. In software terms, this is called “CRUD” - an acronym for Create, Read, Update, Delete.
Laravel promises a full stack framework that’ll make it easier and more secure to create a backend (database) to frontend (user interface).
Now, rather than just using Laravel’s frontend Blade, I figured that since I’m going through the joy of learning, I might as well use a supposedly more sophisticated frontend like VUE or REACT.
Of course, that brings in another language that will need to be reviewed. “Inertia” is used to connect VUE/REACT with Laravel. A lot of Laravel documentation refers to Inertia and Inertia is loaded when a Laravel application is installed.
Mysql also needs to be installed. Here are the Mac instructions for mysql.
Overall View Of Laravel/Vite/Inertia/Vue
In July 2022, Laravel started using vite rather than mixjs to bundle frontend assets.
So, I guess I need to learn how Vite works. Here’s Laravel’s documentation on Vite.
Summary of Laravel Vite Documentation
When building applications with Laravel, you will typically use Vite to bundle your application’s CSS and JavaScript files into production ready assets.
Within a fresh installation of Laravel, you will find a package.json file in the root of your application’s directory structure. The default package.json file already includes everything you need to get started using Vite and the Laravel plugin. You may install your application’s frontend dependencies via NPM:
npm install [frontend dependency]
This is what the package.json file in my app looks like now.

This gives me a better idea of what vite does. It seems like I shouldn’t need to touch the package.json file which is controlled by Laravel and npm.
There’s an additional vite configuration file that can be used according to vite.
Vite is configured via a vite.config.js file in the root of your project. You are free to customize this file based on your needs, and you may also install any other plugins your application requires, such as @vitejs/plugin-vue or @vitejs/plugin-react.
If you are building an SPA (Single page Application), including applications built using Inertia, Vite works best without CSS entry points.
In other words, don’t add css into vite.config.js. Instead, import the css into ‘resources/js/app.js’ like this:
import './bootstrap';
import '../css/app.css';
By the way, vite.config.js is found in the root directory (not in the folder called app).
Beginning With Vue.js
One of the many difficulties that I’ve had is figuring out how to create the frontend using Vue.
In the old days when I was doing simple static websites, I’d go to the bootstrap toolkit. Then load the css and js into an html template via cdn, copy a basic template, and I’d be off and running. Like this from Bootstrap.
<!doctype html>
<html lang="en">
  	  <head>
	    <meta charset="utf-8">
	    <meta name="viewport" content="width=device-width, initial-scale=1">
        <title>Bootstrap demo</title>
        <link href="https://cdn.jsdelivr.net/npm/bootstrap@5.2.0/dist/css/bootstrap.min.css" rel="stylesheet" integrity="sha384-gH2yIJqKdNHPEq0n4Mqa/HGKIhSkIHeL5AyhkYV8i59U5AR6csBvApHHNl/vI1Bx" crossorigin="anonymous">
  	  </head>
  	  <body>
	    <h1>Hello, world!</h1>
	    <script src="https://cdn.jsdelivr.net/npm/bootstrap@5.2.0/dist/js/bootstrap.bundle.min.js" integrity="sha384-A3rJD856KowSb7dwlZdYEkO39Gagi7vIsF0jrRAoQmDKKtQBHUuLZ9AsSv4jD4Xa" crossorigin="anonymous"></script>
  	  </body>
</html>
Much of my difficulty with VUE/Laravel is because of my lack of knowledge (duh). And so, I’ve spent the last couple of days reading documentation.
It’s hard for me to read docs without having some understanding of what I’m reading. So, the last week or so that I’ve spent getting nothing being rendered has been useful into building up some basic knowledge to make the docs somewhat comprehensible.
Today, August 17, 2022, I had a little breakthrough. At least I have something rendered with a bar and buttons rather than just a page filled with errors.
Structure Of Laravel App
I think understanding the basic structure of Laravel has helped. Installing a barebones Laravel app is easy, understanding how it works is nuts. There are so many parts, my head still hurts.
Anyway, this is my simplistic understanding of the Laravel structure after the app is created.
app.js located at resources/js/app.js is very important.
So is resources/views/app.blade.php and package.json. Package.json is located at the root of the entire app - not in the app folder.
The place to begin is with package.json because you can see what dependencies have been loaded/installed.
{
    "private": true,
    "scripts": {
        "dev": "vite",
        "build": "vite build"
    },
    "devDependencies": {
        "@inertiajs/inertia": "^0.11.0",
        "@inertiajs/inertia-vue3": "^0.6.0",
        "@inertiajs/progress": "^0.2.7",
        "@tailwindcss/forms": "^0.5.2",
        "@vitejs/plugin-vue": "^3.0.0",
        "autoprefixer": "^10.4.2",
        "axios": "^0.27",
        "laravel-vite-plugin": "^0.5.0",
        "lodash": "^4.17.19",
        "material-design-icons-iconfont": "^6.7.0",
        "postcss": "^8.4.6",
        "tailwindcss": "^3.1.0",
        "unplugin-vue-components": "^0.22.4",
        "vite": "^3.0.0",
        "vue": "^3.2.31"
    },
    **"dependencies": {**
        "bootstrap": "^5.2.0",
        "bootstrap-vue": "^2.22.0",
        "vant": "^3.5.4",
        **"vuestic-ui": "^1.4.9"**
    }
}
devDependicies are the packages mainly installed automatically by Laravel.
- Inertia which works as the bridge between VUE and Laravel.
- Tailwindscss which is another framework css.
- Vitejs which is the bundler that Laravel now uses.
- autoprefixer looks cool as its a PostCSS plugin which parses CSS and adds vendor prefixes. Lodash is a javascript utility.
- Now, I believe I installed material-design-icons with npm after I installed vueistic (which will be discussed later).
- postcss seems to work with autoprefixer.
- Vue is the framework I’m trying to learn.
Dependencies are all packages I installed.
Vuestic-UI
Let’s focus on vuestic-ui which a user interface Vue3 framework. I decided to use vueistic because it seems similar to bootstrap and I certainly don’t want to make components from scratch. Nor do I want a hodgepodge of components from different developers.
Once vueistic is installed, its components can be found in Laravel at node_modules/vuestic-ui/dist/esm/src/components. These components then can be used “as-is” or modified and combined into other components.
The instructions to install vuestic.ui are here.
npm install vuestic-ui
After running this command, vuestic is added as a dependency to ‘package.json’. Like above.
The second instruction is to include Source Sans Pro and Material Icons fonts.
This can done by importing into the <head> element.
So, I went to app.blades.php which is found at resources/views and added in the TWO ASTERISKED Styles Sheets.
<!DOCTYPE html>
<html lang=". . . ">
    <head>
        <meta charset="utf-8">
        <meta name="viewport" content="width=device-width, initial-scale=1">

        <title inertia> . . . </title>

	** <link href="https://fonts.googleapis.com/css2?family=Source+Sans+Pro:ital,wght@0,400;1,700&display=swap" rel="stylesheet">
        ** <link href="https://fonts.googleapis.com/icon?family=Material+Icons" rel="stylesheet">

        <!-- Scripts -->
        @routes
        @vite('resources/js/app.js')
        @inertiaHead
    </head>

    <body class="font-sans antialiased">

        @inertia

    </body>
</html>
Vueistic also indicates that they can be included in css with the following code. I wonder if it would then work by including these lines in vite.config.js. I’ll have to try it on another day.
@import url('https://fonts.googleapis.com/css2?family=Source+Sans+Pro:ital,wght@0,400;1,700&display=swap');
@import url('https://fonts.googleapis.com/icon?family=Material+Icons');
Examining app.blades.php, Laravel’s structure is beginning to make more sense.
Under scripts, I can see that routes are called.
There’s also something called @inertiaHead. This is a little confusing. There’s a story from Laravel about inertia-head.. There’s also a story about <head> on inertia. I’m going to have to figure this another day.
Anyway, in app.blades.php I see that app.js is referred to with vite (that make sense because vite is the bundler).
And if we go to app.js in ‘resources/js’, you can see that’s where I added the THREE LINES OF ASTERISKED CODE (**) related to Vuestic.
Two import lines:
import { createVuestic } from 'vuestic-ui'**
import 'vuestic-ui/css'**
And one line that is added to the return
.use(createVuestic()
import './bootstrap';
import '../css/app.css';

**import { createVuestic } from 'vuestic-ui'**
**import 'vuestic-ui/css'**

import { createApp, h } from 'vue';
import { createInertiaApp } from '@inertiajs/inertia-vue3';
import { InertiaProgress } from '@inertiajs/progress';
import { resolvePageComponent } from 'laravel-vite-plugin/inertia-helpers';
import { ZiggyVue } from '../../vendor/tightenco/ziggy/dist/vue.m';

const appName = window.document.getElementsByTagName('title')[0]?.innerText || 'Laravel';

createInertiaApp({
    title: (title) => `${title} - ${appName}`,
    resolve: (name) => resolvePageComponent(`./Pages/${name}.vue`, import.meta.glob('./Pages/**/*.vue')),
    setup({ el, app, props, plugin }) {
        return createApp({ render: () => h(app, props) })
            .use(plugin)
            .use(ZiggyVue, Ziggy)
            **.use(createVuestic())**
            .mount(el);
    },
});

InertiaProgress.init({ color: '#4B5563' });
So, now that app.js is where I think it should be, Vueistic components can be added to html code in vue just like bootstrap 5.
I can now type in the name of vueistic components and they will appear.
<va-switch></va-switch>
But default components usually need to be modified or combined.
To make it easier to reuse these modified components, one can just make another component from the basic components.
How To Make A Vue Component For Laravel
In resources/js/Components make a file: component_name.vue
The structure within the file is:
<script setup>

Import if needed;

Function if needed;

</script>

<template>

Html code goes here

</template>

[optional css coding]
<style scoped>

.class {
Attribute: ;
}

#id {
Attribute: ;
}

</style>
Once the component is made, just go to the vue file in js/pages and insert the component where it should go.
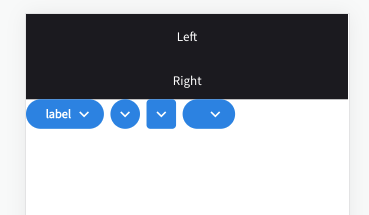
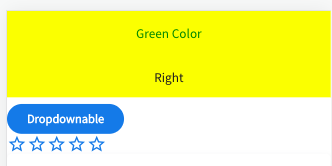
Here’s a simple example of a component that only has taken me about a week to figure out. The navbar color is #FFFF00 (yellow). And the id #greenman changes the text color to green. Also, note that the tag is <style scoped>. By using scoped, the css is limited to just this file.
<script setup>

</script>

<template>
  <va-navbar color="#FFFF00" shape class="mb-2">
    <template #left>
      <va-navbar-item id="greenman">Green Color</va-navbar-item>
    </template>
    <template #center>
      <va-navbar-item>Primary</va-navbar-item>
    </template>
    <template #right>
      <va-navbar-item>Right</va-navbar-item>
    </template>
  </va-navbar>
</template>

<style scoped>
#greenman {
    Color:green;
}
</style>
I named this file NewNavBar.vue and placed it in resources/js/Components.
Now, if I need to use it in some file in resources/js/Pages, like HappyPage.vue, I can just type in
Eureka!!! It works!!!
Okay, now that I got Vue all figured out (yeah, right), it’s time to move on.
Summary Of Process To Create A Laravel App With Vue
This summary uses “items” as the name of the example table. It will likely be different in your app.
- Create MYSQL Database.
Mysql
Create database name_db - Create Laravel Project
composer create-project laravel/laravel --prefer-dist laravel_name_app - Add database info to .env file in root of app
vim .env - Install the authentication package into the laravel app.
composer require laravel/breeze --dev - Install Vue
php artisan breeze:install vue - Need to Run NPM
npm install && npm run dev - Start Server
php artisan serve - Make Table Name - Singular - Capital Letter
php artisan make:model Item --migration - Add Schema To Migration File
- Add fillable properties to Model. Must be done if create method is to be used.
- Make Table with columns.
php artisan migrate - Add Controller.
php artisan make:controller ItemController --resource. - Add under namespace to Controller just made.
use Inertia\Inertia; - Store images in
storage/app/public. Create symbolic link by runningphp artisan storage:link. Then images can be reached by:storage/image.jpg- EXAMPLE -<img src="storage/example-image.jpg">
To practice, I’m going to Shopping list App using Laravel/Vue. This is a simple app for seasoned developers that would take about 10 - 20 minutes. For me, it’ll probably be about a week.
Building a Shopping List With Laravel, Inertia, Vite, Vue, and MYSQL
Here’s my app to make a shopping list.
First:
composer create-project laravel/laravel --prefer-dist shopping1_vue_app

mysql
Tip: To not have to use a password with mysql, create a filed called .my.cnf in the user ~ directory. Add the following to this file and substitute with the real name/password of the admin database user. You also need to have [client].
[client]
user=admin_user_name
password=admin_user_password.
Now, to create a database for the app.
create database shopping1_db;

exit;

cd shopping1_vue_app   (change into the larval app directory)
Edit the .env file and add in the database name, user, password.
vim .env
To install the authentication package into the laravel app:
composer require laravel/breeze --dev
To install vue:
php artisan breeze:install vue
Or to install react:
php artisan breeze:install react
Then:
npm install && npm run dev
To start the server, make sure you’re in the app root directory:
php artisan serve
At this point, a generic app will be running.
A helpful app to install the laravel debug bar.
composer require barryvdh/laravel-debugbar --dev
If the debug bar is not working, then check that in the .env file, app_debug=true.
At this point, there’s a database that’s connected to Laravel. But the database is empty. To make the tables that need to be included for the authentication app:
php artisan migrate
Once this run, the database with have tables to create a user, password, etc.
For the shopping list app, I’ll also need a table for the items.
Laravel has a neat way to create tables, it’s called migrations. For my app, the items table migration file needs to be created first:
php artisan make:migration create_items_table
Switch to the migrations folder that is stored in the database folder.
cd database/migrations
In that folder, there will be a new filed called something like 2022_08_13_005708_create_items_table.php.
In this file, a schema is automatically added that will eventually cause columns to be inserted into the table.
Schema::create('items', function (Blueprint $table) {
             $table->id();
             $table->timestamps();
         });
And so, there are two columns that are included:
id() - which is the primary key
timestamps() - which will cause two columns to be made in the table - "created_at" and "updated_at"
We’re going to have to add at least two more columns in the items table for the shopping list app.
$table->string('name'); (which is going to be the name of the shopping item - "bread" for example)
And these two statements are important:
$table->bigInteger('user_id')->nullable()->unsigned();

$table->foreign('user_id')->references('id')->on('users');
The purpose of these statements is to create a column called user_id that’ll be the equivalent to id of the user from the users table.
This way when you’re later going to read the data, you can limit the shopping list items shown to the user who’s signed in. In other words, my friend doesn’t need to the see all the crap I buy.
To create this tables with these columns in the database, run:
php artisan migrate
And now, the table items has been created with following columns;
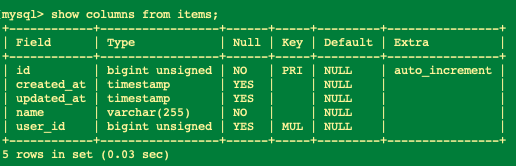
So, id is the primary key for each name/item that’ll be in the shopping list.
created_at and updated_at are self-explanatory.
name is the specific item that’ll be in the shopping list.
user_id is the specific user who is logged in.
By the way, the command to add a column to an existing table is:
php artisan make:migration add_ColumnName_to_TableName --table="name-of-existing-table"
Example where I want to add a “description” column to the table “items”:
php artisan make:migration add_description_to_items --table="items"
MODEL
Laravel has an MVC architecture.
MVC stands for Model-View-Controller.
Model is basically the backend end. View is the frontend. Controller is the way to interact between the Model and the Frontend.
Every table in the database has to have a model. To make a model, use the following command. Here the model name is Item. Laravel uses this naming convention where when you make the Item Model, it will assume that it connects to the ‘items’ table.
php artisan make:model Item
The command to create a migration file, `php artisancan be combined with this command as follows:
php artisan make:model Item --migration
This would create the migration file date_create_items_table and the model file Item.php.
ROUTING
Now that I have the database completed, let me talk about routing which is the way the app will know what to return when the user goes to a certain web address.
There’s a folder called routes. In that folder, there’s a file called web.php.
The routes/web.php file defines routes that are for your web interface. These routes are assigned the web middleware group, which provides features like session state and CSRF protection. Laravel Routing
At this point, it looks like this.
<?php

use Illuminate\Foundation\Application;
use Illuminate\Support\Facades\Route;
use Inertia\Inertia;

/*
|--------------------------------------------------------------------------
| Web Routes
|--------------------------------------------------------------------------
|
| Here is where you can register web routes for your application. These
| routes are loaded by the RouteServiceProvider within a group which
| contains the "web" middleware group. Now create something great!
|
*/

Route::get('/', function () {
	return Inertia::render('Welcome', [
    	'canLogin' => Route::has('login'),
    	'canRegister' => Route::has('register'),
    	'laravelVersion' => Application::VERSION,
    	'phpVersion' => PHP_VERSION,
	]);
});

Route::get('/dashboard', function () {
	return Inertia::render('Dashboard');
})->middleware(['auth', 'verified'])->name('dashboard');

require __DIR__.'/auth.php';
On the top of this file, Illuminate is Laravel’s code, and Inertia connects Laravel to VUE/REACT.
The laravel route uses this general format:
Route::get(URI, function() {

})'
The ‘URI - Uniform Resource Identifier’ is the page name. Here '/' it represents the home page. If it said '/greeting' then it would refer to http://website.com/greeting.
The function() gives the behavior that should be followed. An easy example from Laravel is:
Route::get('/greeting', function () {
	return 'Hello World';
});
So, if you went to http://website.com/greeting, you would see rendered Hello World.
Our routing function is slightly more complex:
First Route
function () {
		return Inertia::render('Welcome', [
    		'canLogin' => Route::has('login'),
    		'canRegister' => Route::has('register'),
    		'laravelVersion' => Application::VERSION,
    		'phpVersion' => PHP_VERSION,
		]);
	}
[
Since this function includes Inertia, the Welcome file that is rendered is contained in resources/js/Pages/Welcome.vue. If Inertia was not included in the app, then the default templating blades would be called instead. And then something would be rendered like is contained at resources/views/welcome.blade.php.
Anyway, the above function instructs the app to return the javascript component (Welcome.vue) and the props (data) that re contained in the []. Those props are passed to the rendered page.
And so the function has to be read in combination with resources/js/Pages/Welcome.vue.
In that file, there is following script at the top:
<script setup>
import { Head, Link } from '@inertiajs/inertia-vue3';

defineProps({
	canLogin: Boolean,
	canRegister: Boolean,
	laravelVersion: String,
	phpVersion: String,
})
</script>
Focusing on the defineProps portion, we see that in Welcome.vue, four variables are defined.
The first two variables are “Boolean” (True or False) and the second two are “String” (text string).
Those variables get their values from the routing function.
'canLogin' => Route::has('login'),
    'canRegister' => Route::has('register')
Route::has(‘login’) and Route::has(‘register’) are checks to see if these Route actually exist. If they do, “True” is returned. When Breeze Authentication was installed, these particular routes were added. So, the value for ‘canLogin’ and ‘canRegister’ are both true.
'laravelVersion' => Application::VERSION,
'phpVersion' => PHP_VERSION,
The above two variables just assigned the string value of the application and php version.
Now, when we look through the rest of resources/js/Pages/Welcome.vue, these values will be substituted.
Second Route
Route::get('/dashboard', function () {
	return Inertia::render('Dashboard');
})->middleware(['auth', 'verified'])->name('dashboard');
Here we see that if you go to http://website.com/dashboard another function with Inertia is returned.
Here resources/js/Pages/Dashboard.vue will be rendered but only if the user is verified.
Laravel includes a middleware that verifies the user of your application is authenticated. If the user is not authenticated, the middleware will redirect the user to your application’s login screen. However, if the user is authenticated, the middleware will allow the request to proceed further into the application. See Laravel
Third Route
require __DIR__.'/auth.php';
This includes all the routes needed for its authorization software and is located at routes/auth.php.
Okay, I kind of know a little about routing, did columns in the database (ie - migrations), guess it’s time for Controllers.
Controllers
Controllers seem to work together with routing. They are stored at app/Http/Controllers.
The generic controller at app/Http/Controllers/Controller.php doesn’t explain very much.
The laravel documentation states:
Controllers are not required to extend a base class. However, you will not have access to convenient features such as the middleware and authorize methods.
Guess, we need those features. Time to construct a controller for my items table. The naming convention for a controller is Upper Camel Case with Controller at the end and singular throughout. Since my tables is items, my controller will be:
php artisan make:controller ItemController --resource
This command will assign the typical create, read, update, and delete (“CRUD”) routes to a controller.
And after running the above command, I now have this file:
app/Http/Controllers/ItemController.php`
This file has the following boilerplate stuff:
<?php

namespace App\Http\Controllers;

use Illuminate\Http\Request;

class ItemController extends Controller
{
	/**
 	* Display a listing of the resource.
 	*
 	* @return \Illuminate\Http\Response
 	*/
	public function index()
	{
    	//
	}

	/**
 	* Show the form for creating a new resource.
 	*
 	* @return \Illuminate\Http\Response
 	*/
	public function create()
	{
    	//
	}

	/**
 	* Store a newly created resource in storage.
 	*
 	* @param  \Illuminate\Http\Request  $request
 	* @return \Illuminate\Http\Response
 	*/
	public function store(Request $request)
	{
    	//
	}

	/**
 	* Display the specified resource.
 	*
 	* @param  int  $id
 	* @return \Illuminate\Http\Response
 	*/
	public function show($id)
	{
    	//
	}

	/**
 	* Show the form for editing the specified resource.
 	*
 	* @param  int  $id
 	* @return \Illuminate\Http\Response
 	*/
	public function edit($id)
	{
    	//
	}

	/**
 	* Update the specified resource in storage.
 	*
 	* @param  \Illuminate\Http\Request  $request
 	* @param  int  $id
 	* @return \Illuminate\Http\Response
 	*/
	public function update(Request $request, $id)
	{
    	//
	}

	/**
 	* Remove the specified resource from storage.
 	*
 	* @param  int  $id
 	* @return \Illuminate\Http\Response
 	*/
	public function destroy($id)
	{
    	//
	}
}
It now looks like I have to add the appropriate function into each of these sections.
Since this app is using inertia, at the top of this controller, use Inertia\Inertia; must be added.
So, the top of ItemController.php is now:
<?php

namespace App\Http\Controllers;

use Illuminate\Http\Request;

class ItemController extends Controller
Another important thing is that in the routing file, web.php, has to include the different routes to the functions in the Controller. This is done in one line of code.
Route::resource('items', ItemController::class);
And if I want the route to be protected by authentication, I just add the authentication middleware ->middleware('auth'); to the route in the web.php file.
Route::resource('items', ItemController::class)->middleware('auth');
Once this code (with or without the middleware) is included, the following routes are created as shown in Laravel documentation (substitute item for photo):
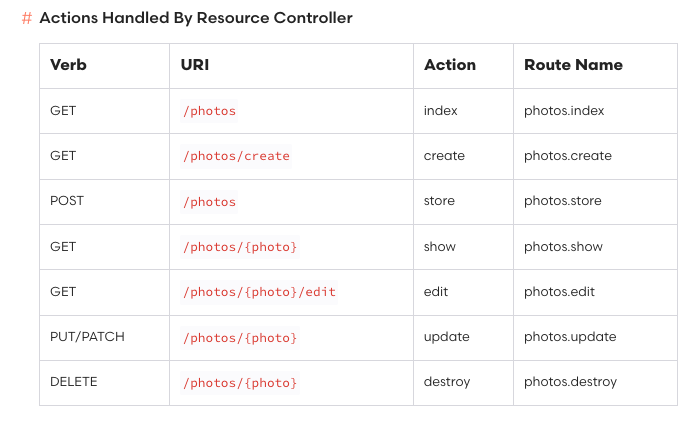 Table From Laravel Documentation
This chart has to be read in conjunction with ItemController.php.
The seven items in the chart match the seven functions in the ItemController.
The next step will be to code the seven functions to match the chart’s actions.
A few of the functions, should just return a view (i.e.-:form) and the others a method to manipulate a table in the database.
Index displays a listing - that should be a view of all the items on the shopping list.
Create should be a view of a form that is used to create an item on the shopping listing. Basically, the name of the item to be inserted. Per documentation, “before using the create method, you will need to specify either a fillable or guarded property on your model class. These properties are required because all Eloquent models are protected against mass assignment vulnerabilities by default.”
Store should be a method of storing the form called in Create. Store should be the way to take the name from the create form and store it into the name column in the items table.
Show should be a form.
Edit should show the form that is used to edit the name of an existing item.
Update should take the name from edit and store it.
Destroy should be a way to delete the name from the items list.
The second function is to return a route to the form that’ll create a shopping list item. But only logged in users should be able to create an item. So, I should just modify the Second Route from above.
public function create()
{
return Inertia::render('Create');
})->middleware(['auth', 'verified'])->name('create');
}
TO BE CONTINUED